Epoxy is a type of resin that, when combined with a hardener, creates a durable and glossy finish. It is commonly used for sealing and protecting surfaces, such as tables, countertops, and flooring. In recent years, epoxy has become a popular choice for DIY projects, including creating stunning table tops.
Here’s a step-by-step guide on how to epoxy a tabletop:
- Before starting the project, it is essential to understand the different types of epoxy resin available. These include casting epoxy and laminating epoxy, specifically for tabletops. The choice of epoxy will depend on the type of finish you want to achieve.
- To epoxy a tabletop, you will need:
- Epoxy resin and hardener
- Mixing container and stir stick
- Protective gear, such as gloves and goggles
- Sandpaper and sanding block
- Painters tape
- Drop cloth or plastic sheet
- Preparation is key before applying epoxy to the tabletop. Start by cleaning and sanding the surface to create a smooth and even base. If there are any knots or cracks, seal them with wood filler. Then, apply a layer of primer to help the epoxy adhere better.
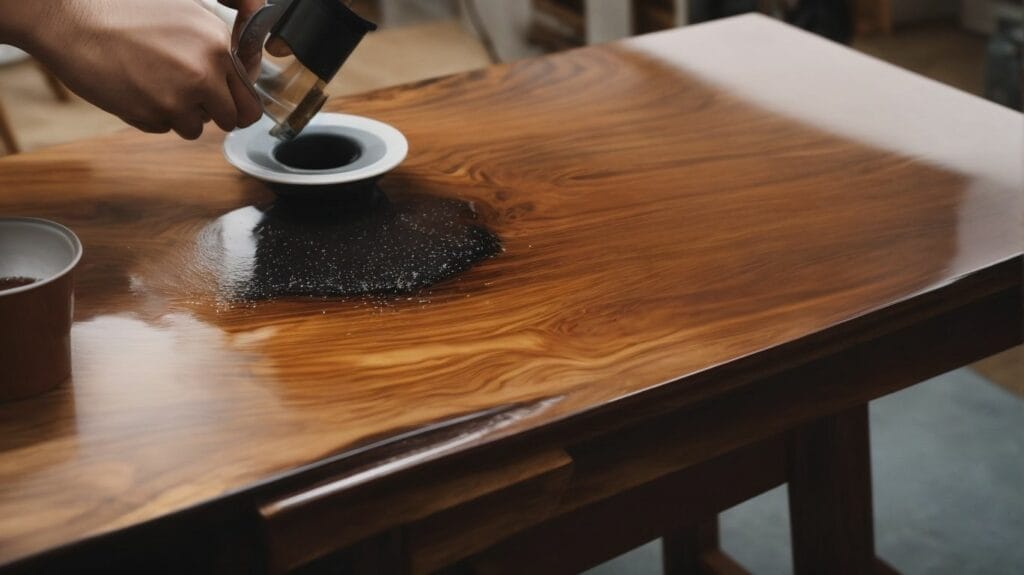
- Now, it’s time to mix and apply the epoxy. Measure and mix the epoxy resin and hardener according to the manufacturer’s instructions. Then, pour the epoxy onto the table top and spread it evenly using a spreader or foam brush. To remove any air bubbles, use a heat gun or gently blow on the surface.
- Once the epoxy has been applied, it’s important to finish and cure it properly. Remove any excess epoxy and allow it to cure according to the manufacturer’s instructions. After curing, sand and polish the surface to remove any imperfections and create a smooth finish. Finally, apply a protective top coat to ensure the longevity of the epoxy finish.
With these steps in mind, you can successfully epoxy a tabletop and create a stunning and durable finished product. Remember to follow safety precautions and carefully follow the instructions for the specific epoxy resin you are using.
Key Takeaways:
- Choose the right type of epoxy resin for your tabletop project, such as casting or tabletop epoxy.
- Proper preparation of the Tabletop, including cleaning, sanding, and priming, is essential for a successful epoxy finish.
- Take your time and follow instructions carefully when measuring, mixing, and applying the epoxy to ensure a smooth and bubble-free finish.
What Is Epoxy?
Epoxy is a type of resin that, when combined with a hardener, produces a strong and rigid material. Its main purpose is to coat surfaces, like table tops, to create a shiny and long-lasting finish. Additionally, epoxy provides resistance against moisture, heat, and chemicals, making it a perfect option for areas with high foot traffic.
If you’re thinking about using epoxy for your Tabletop, be sure to have good ventilation, precisely measure and mix the components, and follow all safety measures.
What Are the Different Types of Epoxy Resin?
When it comes to creating a durable and beautiful epoxy table top, choosing the right type of epoxy resin is crucial. In this section, we will explore the different types of epoxy resin available and their specific uses. From casting epoxy to create thick, solid layers to laminating epoxy to build up layers, we will discuss the various options and their strengths. We will also cover the unique properties and applications of tabletop epoxy, which is specifically designed to create smooth and glossy table surfaces.
1. Casting Epoxy
- Prepare the work area with a drop cloth, ensuring proper ventilation.
- Wear protective gear, including gloves, safety glasses, and a mask.
- Measure and mix the casting epoxy and hardener according to the manufacturer’s instructions.
- Pour the casting epoxy mixture evenly onto the desired mold or surface.
- Eliminate any air bubbles using a heat gun or torch.
- Allow the casting epoxy to cure for the specified time before removing it from the mold or proceeding with further processing.
2. Laminating Epoxy
- Prepare the workspace by laying down a plastic sheet or drop cloth to protect the area.
- Place the table top on a level surface to ensure an even application of laminating epoxy.
- Mix the laminating epoxy according to the manufacturer’s instructions, making sure to combine the resin and hardener thoroughly.
- Use a foam brush or roller to apply a thin, even layer of laminating epoxy to the Tabletop, working in small sections.
- Allow the epoxy to cure for the recommended time, keeping the workspace free from dust and debris.
Fact: Laminating epoxy is commonly used in boat building to create strong and durable laminated structures due to its excellent bonding properties.
3. Table Top Epoxy
- Clean and sand the surface of the Tabletop to remove any dirt, debris, or previous finishes.
- Seal any knots or cracks present in the Tabletop using a suitable wood sealer.
- Apply a layer of primer to the Tabletop to enhance the adhesion of the tabletop epoxy.
- Measure and mix the epoxy resin and hardener according to the manufacturer’s instructions.
- Pour the tabletop epoxy onto the Tabletop and spread it evenly using a notched spreader or roller.
- Remove any air bubbles by using a heat gun or a handheld propane torch.
- Allow the Table Top Epoxy to cure for the recommended time, typically 24-72 hours, in a dust-free environment.
What Materials Do You Need for Epoxying a Table Top?
Before diving into the process of epoxying a tabletop, it is important to gather all the necessary materials. These include epoxy resin and hardener, a mixing container and stir stick, protective gear, sandpaper, a sanding block, painter’s tape, and a drop cloth or plastic sheet. Each of these items plays a crucial role in achieving a successful epoxy finish on your Tabletop. Let’s take a closer look at each material and how it contributes to the epoxying process.
1. Epoxy Resin and Hardener
- Select the suitable epoxy resin and hardener for your project’s specific needs.
- Measure the epoxy resin and hardener in the appropriate ratio as instructed by the product.
- Thoroughly mix the epoxy resin and hardener in a clean container using a stir stick.
- Ensure complete blending to activate the chemical reaction for curing.
- Utilize the mixed epoxy within the designated pot life for the best results.
2. Mixing Container and Stir Stick
- Before starting, make sure to have a clean mixing container and stir stick ready. This will ensure that the epoxy resin and hardener are thoroughly mixed. It is recommended to use a container with volume measurements to ensure accurate mixing ratios.
- Ensure that both the mixing container and stir stick are free from any moisture or contaminants that could potentially affect the epoxy’s curing process.
- For easy cleanup, consider using a disposable mixing container and stir stick.
3. Protective Gear
- When working with epoxy, it is important to wear protective gear, such as safety goggles, to shield your eyes from splashes and fumes.
- Nitrile gloves should also be worn to protect your skin from direct contact with the epoxy.
- For added protection, a respirator mask should be worn to prevent inhaling any harmful vapors.
- Don’t forget to wear a long-sleeved shirt and pants to cover your skin during the epoxy application process.
- Closed-toe shoes are also recommended to safeguard your feet from any spills or drips.
Pro-tip: Always make sure to work in a well-ventilated area and carefully read the safety instructions on the epoxy packaging.
4. Sandpaper and Sanding Block
- Utilize medium-grit sandpaper to sand the surface of the Tabletop thoroughly.
- Transition to fine-grit sandpaper for a smoother finish.
- After sanding, use a sanding block to ensure the surface is even.
Pro-tip: Before applying epoxy, use a tack cloth to wipe away any dust particles from the sanded surface, ensuring a clean and smooth finish with the epoxy.
5. Painters Tape
- Clean the surface of the Tabletop to remove any dirt or dust.
- Apply painter’s tape around the edges of the table to create a barrier for the epoxy.
- Make sure the painter’s tape is firmly pressed down to prevent any epoxy from seeping underneath.
- Check the edges of the tape to ensure a secure seal.
6. Drop Cloth or Plastic Sheet
- For added protection, place a drop cloth or plastic sheet under the table before beginning the epoxy process to prevent any spills from damaging the floor or work surface.
Did you know? Utilizing a drop cloth or plastic sheet not only safeguards your floor but also simplifies the cleanup process after epoxying a tabletop.
How do you prepare the Tabletop for epoxy?
Before diving into the process of epoxying a tabletop, it is crucial to prepare the surface properly for the resin. This section will cover the necessary steps to ensure your Tabletop is prepped and ready for the epoxy application. From cleaning and sanding the surface to sealing any imperfections, we will discuss the key techniques for achieving a smooth and flawless finish. Let’s get started on creating the perfect canvas for your epoxy masterpiece.
1. Clean and Sand the Table Top
- Start by clearing the Tabletop of any debris or dust using a damp cloth.
- Next, use fine-grit sandpaper to sand the table top and create a smooth surface for the epoxy.
Epoxy resins were first developed in the 1930s by Dr. Pierre Castan, a Swiss chemist researching materials for aircraft construction. Due to its versatility, the resin became widely used in various industries, including woodworking, construction, and art, making it a popular choice for table tops and other surfaces.
2. Seal Any Knots or Cracks
- Inspect the tabletop surface for any knots or cracks, and take note of their location.
- Using wood filler or epoxy paste, carefully fill in any knots or cracks, making sure to smooth out the surface.
- Allow the filler to dry completely before moving on to the next steps.
- Once dry, sand the surface until it is completely smooth and ready for the next steps, ensuring the Tabletop is free of any imperfections.
3. Apply a Layer of Primer
- Prepare the table top: Clean the surface and sand it to ensure a smooth finish.
- Seal any imperfections: Apply a layer of primer to the Tabletop to seal knots, cracks, and other imperfections.
- Allow the primer to dry completely before proceeding with the epoxy application.
True story: A DIY enthusiast meticulously prepped a wooden table, applying a primer to achieve a flawless epoxy finish, impressing guests with a stunning, glossy tabletop.
How to Mix and Apply Epoxy to the Table Top?
When it comes to creating a stunning and durable table top, epoxy is a popular choice for its glossy finish and strong adherence. However, the process of mixing and applying epoxy can be intimidating for beginners. In this section, we will guide you through the step-by-step process of mixing and applying epoxy to your Tabletop. From measuring and mixing the resin and hardener to removing air bubbles, we’ll cover all the essential techniques for achieving a flawless epoxy finish.
1. Measure and Mix the Epoxy Resin and Hardener
When measuring and mixing epoxy resin and hardener, follow these steps:
- Read the instructions carefully to ensure the correct ratio of resin to hardener.
- Measure the epoxy resin and hardener according to the specified ratio.
- Pour the resin into a clean mixing container first, followed by the hardener.
- Use a stir stick to combine the two components thoroughly.
- Mix for the recommended time to achieve a complete blend.
For best results, work in a well-ventilated area and wear protective gear.
2. Pour the Epoxy onto the Table Top
- Prepare the work area by laying down a drop cloth or plastic sheet.
- Place the table top on a level surface to ensure an even and steady pour of the epoxy.
- Use painter’s tape to create a barrier around the edges to contain the epoxy.
- Mix the epoxy resin and hardener according to the manufacturer’s instructions.
- Begin pouring the mixed epoxy onto the Tabletop in a steady and controlled manner.
- Spread the epoxy evenly using a spreader or brush to cover the entire surface.
- Eliminate any air bubbles by carefully running a heat gun or torch over the surface.
3. Spread the Epoxy Evenly
- Ensure the table top is level to prevent pooling.
- Use a heat gun or torch to remove air bubbles.
- Work methodically from one end to the other.
- Consider employing a notched trowel to achieve a consistent thickness.
When spreading the epoxy evenly, take your time and work systematically to achieve a flawless finish. It’s crucial to maintain a level surface and remove any air bubbles for a professional-looking result. Additionally, make sure to follow step 3 and spread the epoxy evenly for the best outcome.
4. Remove Any Air Bubbles
- To remove any air bubbles, carefully use a heat gun or propane torch to move over the surface, popping any visible bubbles.
- If bubbles persist, gently blow over the surface with a straw to push them to the edge, then use a pin or needle to pop them.
- Allow the epoxy to self-level for a few minutes, as this may help some of the bubbles disappear.
How do you finish and cure the epoxy table top?
Now that the epoxy has been poured and spread evenly on the Tabletop, it’s time to finish and cure the surface to achieve a glossy, durable finish. In this section, we will discuss the steps to remove any excess epoxy and ensure a smooth surface. Then, we’ll dive into the process of allowing the epoxy to cure properly so your Tabletop will be ready to use in no time. Get ready to learn how to achieve a professional and stunning finish for your epoxy table top.
1. Remove Any Excess Epoxy
- Scrape any excess epoxy with a putty knife
- Use a heat gun to soften and remove any extra epoxy
- Sand the surface to eliminate any remaining epoxy residue
- Clean the Tabletop with a damp cloth
Pro-tip: For a seamless finish, apply painter’s tape along the edges of the table before applying epoxy to make excess removal effortless.
2. Allow the Epoxy to Cure
- Place the Tabletop in a dust-free, warm area and allow the epoxy to cure for at least 24 hours.
- Avoid touching or disturbing the epoxy during the curing process to ensure a smooth, even finish.
- After curing, the epoxy should be hard and ready for light use, but a full cure can take several days.
- Protect the curing table top from dust, hair, or any other contaminants that could mar the epoxy surface.